Facebook Adds Scheduled Posts
 We use Hootsuite to schedule all our social media posts… but we are happy to announce that Facebook has advanced. They just released a feature so that fan pages can now schedule future posts.
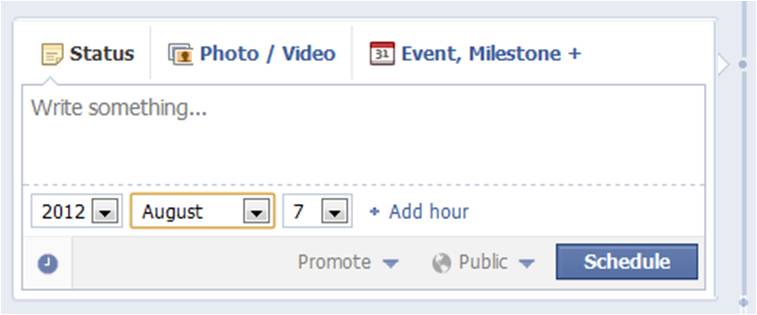
If you choose a date in the past, the post will appear immediately at the appropriate place on your Page’s timeline. If you want to prepare a post and schedule it to appear in the future, you do that by adding a date and time before you post it. You can schedule a post up to 6 months in advance in 15-minute intervals.
After clicking in the status box and choosing the type of post to add to the fan page:
– Click the clock icon in the lower-left of the sharing tool
– Choose the future year, month, day, hour and minute when you’d like your post to appear
– Click Schedule
Facebook New Admin Roles
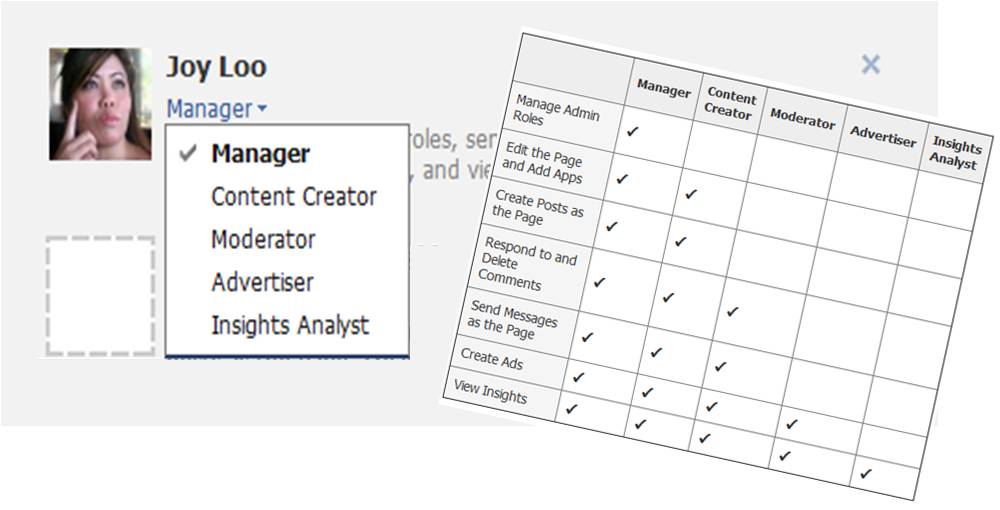 Finally, you can now change permissions for admins on your Facebook page for business!
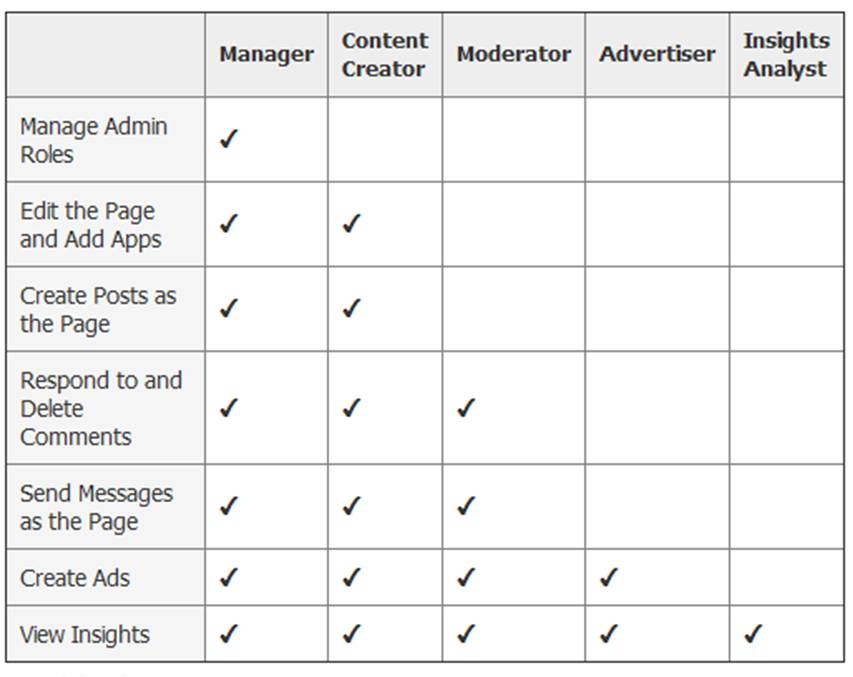
Businesses can now appoint different permissions for admins on fan pages, which are “Manager,” which has access to everything, followed by “Content Creator,” “Moderator,” “Advertiser” and “Insights Analysts,” which has the least amount of abilities and can only see a page’s statistic.
Handling many Facebook fan pages we see the huge security risk of adding new admins to a business fan page. Facebook’s old version basically had it set up so if another admin was added they would have the ability to remove everyone else as an admin, resulting in losing ownership of Facebook fan page!
It’s very easy to figure out what permissions you should give your FB admins by looking at the handy chart FB created below:
If you are owner or manager of the fan page, then it is a good idea to set yourself as the manager then set permissions for anyone else below manager status so they cannot change admin roles.
Here are the steps to adding additional admins or changing roles Facebook fan page:
– Open your Page’s admin panel
– Click Edit Page
– From the left column menu, click Admin Roles
– Type the names of other people you’d like to add in the open field
– Click Manager below the name to choose what kind of admin you want to add
– Click Save Changes
– To change what kind of admin someone is, follow the steps above but skip step 4. You’ll need to enter your password to confirm the change.
Static HTML Update for Facebook Timeline
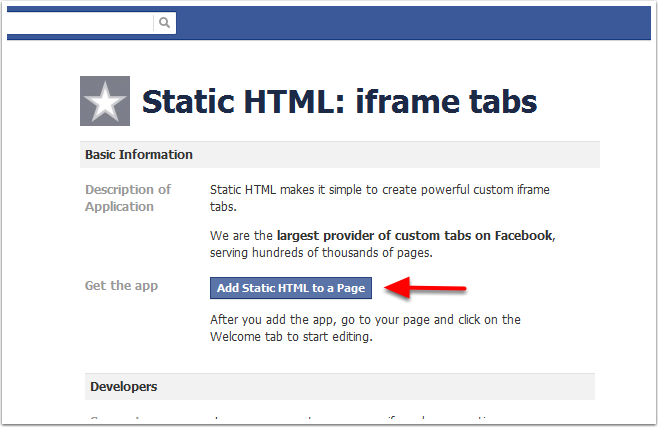 For those of you that love and use Static HTML: iframe tabs for your Facebook fan page, here’s an update we came across. And for those of you that are not using it yet, what are you waiting for… Static HTML allows you use your own HTML, CSS, FBML and Javascript to make totally custom Facebook tabs. No restrictions, SSL enabled, and Like-gating.
From the Static HTML team here is there update… we’ve updated and tested out the below for our clients Facebook fan pages and was easy as pie.
Here’s what you need to know about Timeline and your tabs: Your tabs on Static HTML will remain unaffected by the changes, and the new timeline dimensions are now available on all versions of this app.
Landing Tabs
– Landing tabs are still alive and well, you can still direct people to tabs created with Static HTML via links that you control, such as Facebook ads (there’s an option for destination tab). But unless the user follows a direct link to your tab, they will land on your Timeline.
Landing Tab Substitutes
– Put your landing tab as the first tab after the photos (scroll over the tab icon in your admin panel, and select the second most tab after Photos to “Swap position with”. (Photos is Facebook’s default first tab, currently you can’t change it).- Pin your call to action and include a link to your actual landing tab. To pin a status, (1) post your status, then (2) scroll over the status and in the upper right click “Pin to Top.”
Dimensions
– All Static HTML tabs can now be 810 pixels wide when used on a Timeline page. To adapt a 520 pixel tab, all you need to to is convert your page to timeline, then go to your tab and re-save it.
Like gating
– Like gating still exists within tabs, but currently Facebook doesn’t refresh the tab after someone likes it. It is unclear whether this is a bug or a new policy — we’re keeping an eye on it. If it isn’t a bug, we will build a workaround that will be available by default within Static HTML.
Custom Icon
– On Timeline pages you can now also select a bigger custom icon for tabs (111×74 pixels) through Facebook itself. To do this, go to your page > Edit Info > Apps > Edit Settings > Change Icon (here you’ll upload an image).- We’re researching ways to change the icon directly in the app, to provide simpler organization of all pages you admin.
For more information on all of these things, see this article: http://mashable.com/2012/02/29/facebook-brand-timelines-changes-marketing/
Facebook Timelime for Your Business
Q: What is Facebook Timeline?
 A: Mission control for your business on Facebook
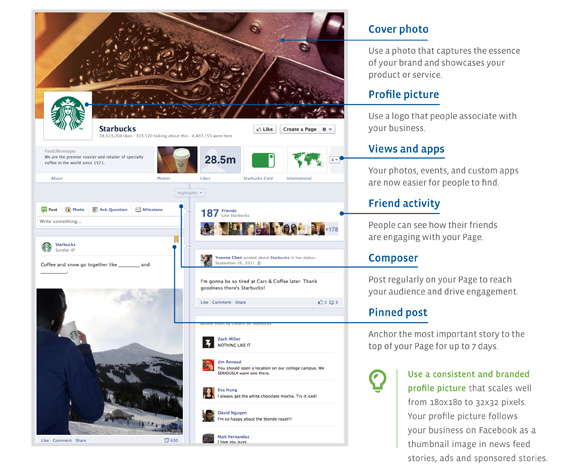
Timeline is an evolution of Facebook’s pages that replaces the Profile and Wall pages, and merges them together. It shows the story of your company, as you choose to tell it, in a visual, scrolling, reverse-chronologically ordered timeline. It’s a cross between visual blog and online scrapbook. Read below for a list of features that comes with this new format.
Fan Pages
Fan Pages are the essential place on Facebook for businesses to build connections with people. It’s where you connect with fans by announcing new products, sharing news, and gathering feedback. Your Fan Page is also where you create unique brand content that can become ads and sponsored stories. It’s the core place for businesses to manage their posting and advertising content.
The new Timeline Pages allow you to:
- Express your identity with features like cover photo and Page timeline.
- Reach and engage your audience on the web and on mobile.
- Respond to people in a quick, more personal way.
TELL ME MORE ABOUT FACEBOOK TIMELINE
Facebook Timeline Quick Guide
Facebook announced this past September that they were going to roll out a new “Timeline” look for Facebook. Seems like they are continuously keeping users on their toes by changing things when you’re not looking. It was supposed be released in September, then November, then December. We’ve had a chance to play around with it and here are our thoughts
and tips.
TELL ME MORE ABOUT FACEBOOK TIMELINE
- The layout is much like a scrapbook and displays your life from the time you joined Facebook. Once you make the switch to the new Timeline layout, make sure to go through and delete any post you might not want anyone to see. Some posts you had hidden before more than likely will be shown on the wall for all to see.
- NO MORE LANDING PAGES! When we explain the main feature changes to clients, one of the biggest complaint is the removal of the default landing tab. We used this landing tab to create custom landing page for fans and non-fans using an iFrame, an opt-in newsletter box, run contests and give fans a reason to join the Facebook fan page.
- With the new Timeline design, you get a rather large area called the “cover image” at the top of your page. Who knows you may not even miss the landing tab disappearance with this piece of prime real estate that is always visible to fans and non-fans. When designing a new cover image make sure to keep in mind that the dimensions are 851 pixels wide by 315 pixels high.
- No more Facebook landing pages but you can still have the custom tabs
- Take a peek at what your Facebook fan page will look like before March 30th.
- App Showcase – Your tabs have not dissappeared… they have just migrated to a section below your large cover image. Your ‘tabs’ are now displayed as apps or views. You have a limit of 12 apps and only four are always displayed. The first one is always Photos and cannot be moved. ‘Views’ are Facebook’s default apps or features such as Photos, Events, Likes, Notes, Map. Apps are all third party apps.
- Custom App Photo – Creating your own app image is easy! The dimensions are 111 x 74 pixels. To add/change a custom thumbnail, first expand all apps by clicking the small down arrow to the right of the four app display. Then hover over any app > click the edit pencil > click Edit Settings > click Change next to Custom Tab Image (opens in a new window) > click Change > upload an image. The image loads and saves right away.
- Pinning Posts – Another new feature is that any post made by the Page can be pinned the top of the wall for up to 7 days. This is a great way to keep highlighed things at the top while continuously updating to your fans. Be sure to rotate the pins so that you keep things fresh!
- Highlight Wall Posts – Fan Page Admins can make any wall post as double wide… meaning the post spreads across both columns of the Timeline. To do this, hover over a post and click the star icon to highlight.
Facebook Timeline Cover Photo Guideline
We’ve come across some really great Facebook Timeline cover photos. We would like to share with you the samples we liked and how we customized our own. See our tips below:
Your Facebook Cover Image
Dimensions for the large cover image is 851 x 315 pixels. If you upload an image that’s smaller than these dimensions, it will get stretched to this larger size. The image you upload must be at least 399 pixels wide. Facebook encourages you to change your cover image as often as you wish. Newsflash: each time you change your cover image, this posts on to your wall and goes out into the news feed of your fans.
Square Profile picture
Your profile picture is always a square and is displayed at 125 x 125 pixels or 150 x 150 pixels, depending on the size of someone’s screen. The photo you upload must be at least 180 x 180 pixels. Facebook discourage page owners from changing their profile picture that often. This is the primary, instantly-recognizable image that tracks you throughout Facebook wherever your posts go and wherever you comment as your Page.

